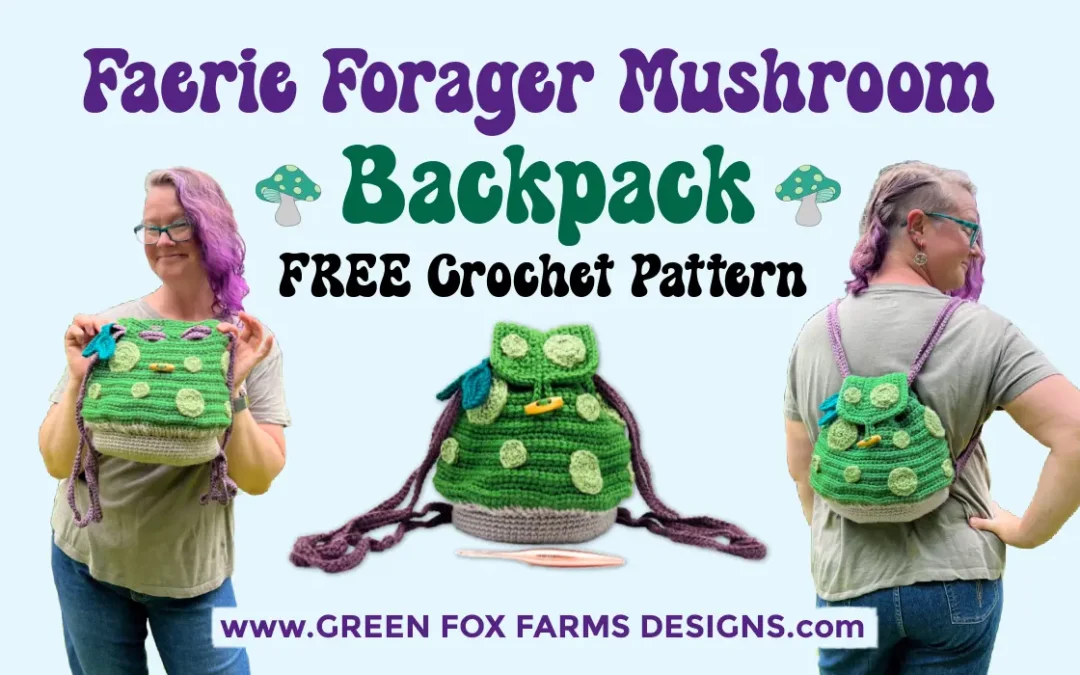
Free Fairycore Crochet Backpack Pattern
If you’ve been searching for a free crochet backpack pattern that feels straight out of a fairy tale, this Faerie Forager Mushroom Backpack might be the project for you. Inspired by fairycore and cottagecore trends, it combines earthy textures with playful woodland vibes. The design works perfectly for everyday wear, cosplay costumes, medieval festivals, or even as a statement bag at comic conventions. Best of all, this free fairycore crochet backpack pattern is part of the Furls Crochet blog hop, so you can grab the pattern and explore other magical designs along the way.🍄
DISCLOSURE: This post may contain affiliate links. See my Privacy Policy for more infomation.
If you love ‘shrooms too?! 🍄
See my other Free Mushroom Bag Crochet Patterns!
- Magical Mushroom Crochet Dice Bag Pattern
- Free, Easy Mini Mushroom Bag Crochet Pattern
- Mushroom Book Sleeve Free Crochet Pattern 🍄
What Is Fairycore and Cottagecore?
Fairycore and cottagecore styles celebrate soft, nature-inspired aesthetics filled with mushrooms, flowers, and rustic details. These trends pair perfectly with handmade crochet pieces like this cute mushroom backpack. Fans of cosplay, medieval fairs, and comic conventions love using fairycore accessories to finish their outfits. The earthy textures of crochet make this bag ideal for dressing up as an elf, woodland fae, or traveling adventurer at festivals and fantasy events.
Want the Power to Pause Your Project??
Want a better way to keep track of your works in progress? Download a FREE copy of my Printable WIP Cards and never forget which hook, or yarn, or pattern you were using again!


A Magical Mushroom Backpack for Fairycore Fans
This Faerie Forager Mushroom Backpack pattern brings together everything people love about fairycore and cottagecore trends like the soft and trendy greens that mimic those of the forest, natural textures, and more than a hint of fantasy.
The backpack’s shape mimics a classic toadstool cap with a roomy drawstring pouch, perfect for everyday wear or for adding a whimsical addition to handmade outfits. The backpack is constructed with a flat back for comfort and a round front for an ultra-realistic look!
You’ll love the thoughtful details like the multi-sized spots, top flap for extra security, and the adorable leaf bag charm! PLUS, this free crochet backpack pattern is part of the Furls Crochet blog hop, making it easy to find more other free patterns too.
Fun & Free Crochet Backpack Pattern
This free backpack crochet pattern is absolutely a pleasure to create and designed with your convenience and comfort in mind! The mushroom backpack closes with drawstrings that double as the backpack straps, but also includes the extra security of a buttoned top flap!
Plus you won’t need a liner for this backpack! You will enjoy working quickly with doubled worsted weight yarn, and creating linked stitches to give this crochet backpack pattern structure, without holes! Plus fun added details like spots and the adorable leaf bag charm make this one extra special. This pattern is rated intermediate, but does have detailed instructions and photo tutorials to guide you to success! Adventurous Advanced Beginners should have no problem giving this fun crochet pattern a go! Just take it slow!
This project is perfect for Netflix and chill nights, with lots of repetition, so whether you watch your fave movie on Netflix or Prime Video, or pick a new, bingeable audiobook, while working on your Mini Mushroom Crochet Dice Bag Pattern! I have just started binge watching The Last of Us (again) so that we can watch the new season and I’m already hooked all over again… (pun intended!) Ha! I am also currently devouring Still the Sun by Charlie N. Holmberg on Audible. I highly recommend this excellent book if you like unique fantasy and world building. 💜

Where to Wear Your Faerie Forager Backpack
The Faerie Forager Backpack isn’t just for cosplay or festivals; it’s made to be carried everywhere. Its roomy design makes it practical as a mini backpack purse, light daypack, or even for gathering wildflowers, mushrooms, and berries on nature walks!
The forest inspired palette feels especially fitting for fall, though it’s easy to customize for spring fairs or summer adventures too. Pair it with fairy wings or chunky boots, and it instantly transforms into a statement piece that stands out at festivals, in everyday life or fantasy events.
Ideas for when and where to use your mushroom backpack:
- School or daycare bag for kids who love nature-inspired accessories
- Cosplay events, renaissance fairs, and comic conventions
- Market stalls or handmade festivals where it doubles as a conversation starter
- Autumn walks and foraging trips — roomy enough for acorns, pinecones, or small finds
- Craft storage bag for yarn, hooks, or on-the-go projects
- Everyday tote for eco-friendly shopping or picnics
Free Crochet Mushroom Backpack Pattern Details
The Faerie Forager Backpack is a free pattern available on my blog, designed to fit everything from daily essentials to trinkets gathered on woodland walks. The stem is crocheted in single crochets and post stitches for the gills, while the cap adds texture with linked stitches, sewn-on spots and soft shaping. The drawstring closure makes it easy to use and keeps it functional for both kids and adults.
Also, this mushroom backpack crochet pattern works with doubled worsted weight yarn, making it a great stash-busting project. You’ll find that this crochet backpack pattern works out quickly for the size with the doubled yarn, and you’ll love the fantastic details that truly make this a unique and stunning pattern that you’ll love showing off!
Follow my Blog on Bloglovin’

A Fiber Filled Fungi Thanks to Furls!
I want to say a big thank you to Furls Crochet for the opportunity to bring my Mushroom Crochet Backpack Pattern to life! I am so thrilled to get to participate (again!) in the Furls Blog Hop 2025, and create my Fungi-tastic Crochet Backpack Pattern for this fantastic event! Make sure to check out all the other amazing and free pattern designs all year long on the Furls Crochet Blog Page!
I am so appreciative of their generous gift of the gorgeous Furls Wander Acrylic Yarn I used to design this stunning mushroom crochet backpack pattern to share with y’all! I am so in love with this yarn. First of all, with such an amazing assortment of gorgeous colors from brights to pastels to neutrals there is something for everyone! The yarn is both soft and sturdy, with a really pretty sheen. I would highly recommend trying Furls Wander yarn for yourself because you know it will work up beautifully, and it was so much fun for me to choose my colors, I know y’all will have the same great experience too! 🧶
And of course, what would a hooker do to create a pattern without a favorite crochet hook from Furls? For me this hands down the absolutely dreamy Streamline Metal Hooks! I opted to use Blush Streamline Metal, since it’s gorgeous and it was an absolute dream to work with! This hook is beautiful to look at and a pleasure to work with, a combo I find myself reaching for again and again. This style hook from Furls is one of my favorites to use for acrylic and wool yarn – so the combination of the Streamline Metal hook and the Wander Acrylic yarn makes for a very satisfying project! But don’t just take my word for it, try them out for yourself!
How to Make a Mushroom Crochet Backpack Pattern!
This free crochet pattern is written in US crochet terms.
MATERIALS:
YARN: Furls Wander Acrylic Yarn Worsted Weight 4 yarn, (100% acrylic, 3.5 oz/100 g, 120 yds/109 m)
100 – 120 yds: Stem – Mist (Holding 2 strands together)
300 – 320 yds: Cap – Arbor (Holding 2 strands together)
50 – 60 yds: Drawstrings – Vineyard
20 – 30 yds: Spots – Patina (great for scraps!)
3 – 5 yds: Leaf Charm – Abyss (great for scraps!)
HOOK: US J/10 6.0 mm for stem, cap and top flap
US G/6 4.0/4.25 mm for spots, strings, and leaf charm
OTHER SUPPLIES:
Size: (Sizing is approximate)
11” tall x 9-11” wide x 3-4” deep
Gauge: 13 sc x 14 rows = 4” x 4”
Gauge is not very important for this pattern, and given for reference.
Gauge was calculated using 2 strands of yarn and J/10 6.0 mm hook
Experience Level: Intermediate
Need some help with the stitches? Check out my Learn to Crochet Series and my fun Crochet Tutorials! You can also reach out at any time! I am more than happy to help you with any questions you may have!
Pattern Key:
Written in US English Crochet Terms
st(s) – stitch(es)
sp(s) – space(s)
ch(s) – chain(s)
sl st – slip stitch
sc – single crochet
hdc – double crochet
dc – double crochet
tr – treble crochet
sc2tog – decrease by sc 2 sts together
fpdc – front post double crochet
ldc – linked double crochet (see special sts)
ltr – linked treble crochet (see special sts)
spk st – spike stitch (see special sts)
yo – yarn over
BLO – back loop only
FO – fasten off
Special Stitches:
Front Post Double Crochet:
Stitches are worked around the post of the stitch, not through the loops.
STEP 1: Yo, insert hook from front of the work, through space 1- around post of st, to the back of the work.
STEP 2: Working behind post, insert hook from back around post of st – through space 2, to the front of the work.
STEP 3: Yo, pull up a loop through both spaces 1-2 (around post), ending in front of work.
STEP 4: Yo, pull through first 2 loops on hook, yo again and pull through last 2 loops on hook. Front post double crochet completed.
STEP 5: For each additional st, space 1 will be the same as space 2 from previous st.

Crochet Magic Circle Tutorial:
VIDEO TUTORIAL: https://youtu.be/CrochetMagicCircle
STEP 1: Create a loop with yarn, place hook through the loop, yo and pull the yarn through the loop, keeping the loop open in a circle instead of pulling the yarn tight.
STEP 2: Ch 1, insert hook back in circle, yo and pull up a loop through the circle. Yo again pull through the 2 loops on the hook, 1 sc completed!
STEP 3: To create additional sc stitches, insert hook back in circle, yo and pull up a loop through the circle, yo again and pull through the 2 loops on hook, sc complete.
STEP 4: Create the number of sc indicated in the pattern. Hold stitches with one hand, gently pull the yarn end with the other hand to close the circle. When the circle is closed, insert your hook into the loops of the first stitch, follow the pattern directions to slip stitch or create next stitch.
Linked Double Crochet (ldc):
1st stitch of row: Insert hook in 2nd ch from hook and pull up loop, insert hook in 4th ch of beginning ch (or next stitch) and pull up loop (3 loops on hook). Yo and pull through 1st 2 loops on hook, yo again and pull through last 2 loops on hook. Ldc stitch complete.
2nd stitch of row: Insert hook in horizontal bar of previous st and pull up loop, insert hook in next st and pull up loop (3 loops on hook). Yo and pull through 1st 2 loops on hook, yo again and pull through last 2 loops on hook. Ldc stitch complete.

Linked Treble Crochet (ltr):
1st stitch of row: Ch 4, insert hook in 2nd ch from hook and pull up loop, insert hook in 3rd ch from hook and pull up loop, insert hook in next stitch and pull up loop (4 loops on hook). Yo and pull through 1st 2 loops on hook, yo and pull through next 2 loops on hook, yo again and pull through last 2 loops on hook. Ltr stitch complete.
2nd stitch of row: Insert hook in top horizontal bar of previous st and pull up loop, insert hook in lower horizontal bar and pull up loop, insert hook in next st and pull up loop (4 loops on hook). Yo and pull through 1st 2 loops on hook, yo and pull through next 2 loops on hook, yo again and pull through last 2 loops on hook. Ltr stitch complete.

Linked treble worked into a treble crochet, Round 16.


Want the Power to Pause Your Project??
Want a better way to keep track of your works in progress? Download a FREE copy of my Printable WIP Cards and never forget which hook, or yarn, or pattern you were using again!
The Most Fun(gi) Crochet Backpack Pattern Testers!
I really am incredibly blessed to have such amazing and dedicated crochet backpack pattern testers!! I greatly appreciate my amazing pattern testers for test crocheting their fab and fun(gi) mushroom bag projects, and offering their invaluable feedback about the pattern! I couldn’t do this without you absolutely amazing hookers!
It absolutely makes my day getting to see the fungi-tastic projects y’all create with my designs! My awesome pattern testers play a crucial role in bringing you the highest quality patterns. Check out their magical mushroom crochet backpacks they made using this pattern, below!
Thank you so much for testing the Faerie Forager Mushroom Crochet Backpack Pattern: Robin Quade, Asia Wicht, Anna Kendig, Cheryl Klassen, Angela Livingston, and Courtney Jarrard.


NOTES:
- Read through the entire pattern first to familiarize yourself with the process.
- Beginning chain does not count as a st. 1st st of each round should be placed in the same st as beginning ch 1. Sl st does not count as a stitch unless otherwise indicated. Sl st does count as a st on the final round the the spots.
- Repeat stitches between [ and ] the number of times indicated.
- Stem, Cap, top flap are worked with 2 strands of yarn held together.
- Spots and top flap are worked separately, then stitched to the cap.
- Strings are woven through cap at round 16, then ends are inserted in stem bottom corners an knotted to keep them in place. This allows the length to be adjustable.
- Backpack is flat on the back with a front rounded to look like a 3-D mushroom.
- This pattern is FREE, and has been thoroughly tested and tech edited. Please feel free to share any comments or ask any questions you may have! I welcome your feedback!!
- This post and all it contains including the pattern and photographs are my intellectual property and copyright protected property of GreenFoxFarms LLC © 2025. You are welcome to make as many as you like to sell, give away, etc. You may NOT sell, or alter and claim as your own this pattern. You may not use my photographs. This pattern is not for mass production.
- If you want to share this pattern online, you must only share a link to my blog post. You may not copy and paste my text or the pattern to another site. Thank you for respecting my work.
- By using this pattern, you are agreeing to abide by these terms.

Mushroom Crochet Backpack Pattern Release:
This mushroom crochet backpack pattern is now available for purchase in my Ravelry and Etsy shops! The pattern is free here on my blog, OR you can purchase the ad-free, printer friendly, PDF copy for a couple of dollars. The PDF also includes detailed written instructions and photo tutorials as well as complete pattern support. I want you to succeed when you make my patterns and I’m here to help as needed.
Want to treat yourself to an ad-free, printer-friendly PDF? You can grab it for a small fee in my Etsy or Ravelry shop. Saving the pattern or adding it to your favorites helps more people find it too, so thank you so much for your support — it truly means the world to me!
Here’s what you can do next:
- 💜 Get the Free Pattern right here on the blog — scroll down to start stitching the Free Granny Square Crochet Pattern!
- 🧶 Buy the PDF: Prefer no ads and easy printing? Grab the downloadable version from my shops.
- 📌 Save it for later on your favorite platform — every share and heart helps my small biz grow.
- 🎥 New to crochet? Check out my Crochet Tutorials where I walk you through basic stitches with video support.
- 🎁 Want more perks? Join my VIP Email List and Facebook Group to access exclusive discounts, CALs, giveaways, and pattern previews!
Thanks again for being here! You hookers are the reason I get to do this everyday. I hope this fun and fabulous belt pouch brings a smile to your face every time you use it!
Pattern Download RAVELRY
Click the Buy NOW button below to purchase a Printer Friendly, Ad-Free, FULL PDF Download version including DETAILED INSTRUCTIONS and MANY PHOTO TUTORIALS of the Faerie Forager Mushroom Crochet Backpack Pattern on RAVELRY!
Pattern Download ETSY
Click the Buy NOW button below to purchase a Printer Friendly, Ad-Free, FULL PDF Download version including DETAILED INSTRUCTIONS and MANY PHOTO TUTORIALS of the Faerie Forager Mushroom Crochet Backpack Pattern on ETSY!

Free Mushroom Crochet Patterns
Do you love making mushroom crochet patterns? These fab fungi are so popular these days and I am all about it! I absolutely love designing them and y’all keep telling me you want to see more of them! If you love free mushie crochet patterns too, then when you’re done making this bag, you will want to check out my other mushroom patterns! If you prefer quick and simple, then you will love my Mini Mushroom Dice Pouches Pattern, with 2 different size trinket/dice pouches to make. The midi size holds a few sets of dice, and the mini size holds 1-2 and doubles as an earbud holder too! If you’ve got a larger dice collection, or just like keeping your dice all in one place, then you will want to make my Mystical Mushroom Dice Bag Pattern with a large stem for holding a bunch of dice, or whatever your heart desires! Or if you’re more into books then you will love my double duty Toadstool Tales Book Sleeve Pattern, which also offers a unique and super cool way to protect your latest read! This one also includes instructions to add a strap for a fab and fun(gi) crossbody bag too! I’m sensing a pattern here (pun intended! 😝) So if you love mushrooms and fungi as much as I do, make sure to check those other patterns out too!


Faerie Forager Mushroom Backpack:
Crochet Backpack Pattern Directions:
MUSHROOM STEM:
- Work holding 2 strands together.
- The base of the stem is worked in half circle rows 1-14.
- The sides of the stem and gills are worked in rounds 15-23.
Row 1: Make a Magic Circle with 2 strands of Stem Color held together. Ch 1, 3 sc in magic circle, turn, (3 sc).
Row 2: Ch 1, 2 sc in each st, turn, (6 sc).
Row 3: Ch 1, [2 sc, sc in next st,] 3 times, turn, (9 sc).
Row 4: Ch 1, [2 sc, sc in next 2 sts,] 3 times, turn, (12 sc).
Row 5: Ch 1, [2 sc, sc in next 3 sts,] 3 times, turn, (15 sc).
Row 6: Ch 1, [2 sc, sc in next 4 sts,] 3 times, turn, (18 sc).
Row 7: Ch 1, [2 sc, sc in next 5 sts,] 3 times, turn, (21 sc).
Row 8: Ch 1, [2 sc, sc in next 6 sts,] 3 times, turn, (24 sc).
Row 9: Ch 1, [2 sc, sc in next 7 sts,] 3 times, turn, (27 sc).
Row 10: Ch 1, [2 sc, sc in next 8 sts,] 3 times, turn, (30 sc).
Row 11: Ch 1, [2 sc, sc in next 9 sts,] 3 times, turn, (33 sc).
Row 12: Ch 1, [2 sc, sc in next 10 sts,] 3 times, turn, (36 sc).
Row 13: Ch 1, [2 sc, sc in next 11 sts,] 3 times, turn, (39 sc).
Row 14: Ch 1, [2 sc, sc in next 12 sts,] 3 times, (42 sc).
You will now begin working in the round to create the sides of the stem.
Round 15: Ch 1, working along the flat edge of the half circle, evenly sc 28 sts across, then rotate working around the curve in the sts of row 14, sc in BLO next 42 sts, sl st to 1st st to join, (28 sc, 42 sc in BLO).
Rounds 16-24: Ch 1, sc in each st around, sl st to join, (70 sc, 6 rounds).
Round 25: Ch 1, sc in next 30 sts, [fpdc, 2 fpdc in next st,] 20 times, sl st to join, (30 sc, 60 fpdc).
Round 26: Ch 1, sc in next 30 sts, fpdc in next 60 sts, sl st to join, (30 sc, 60 fpdc). FO, weave in ends. Continue with Mushroom Cap.
MUSHROOM CAP:
- Work holding 2 strands together.
Pro Tip: After completing last st of ldc/ltr rounds, insert hook thought horizontal bar of the last st, then top of 1st st, yo and pull through all loops on the hook for a clean join!
Round 1: Attach Cap Color at 1st st of previous round. Ch 1, sc in each st around, sl st to join, (90 sc).
Round 2: Ch 3, ldc in each st around, sl st to join, (90 ldc).
Round 3: Ch 1, sc in next 30 sts, [sc in next 8 sts, sc2tog,] 6 times, sl st to join, (84 sc).
Round 4: Ch 3, ldc in each st around, sl st to join, (84 ldc).
Round 5: Ch 1, sc in next 30 sts, [sc in next 7 sts, sc2tog,] 6 times, sl st to join, (78 sc).
Rounds 6-7: Ch 3, ldc in each st around, sl st to join, (78 ldc, 2 rounds).
Round 8: Ch 1, sc in next 30 sts, [sc in next 6 sts, sc2tog,] 6 times, sl st to join, (72 sc).
Round 9: Ch 3, ldc in each st around, sl st to join, (72 ldc).
Round 10: Ch 1, sc in next 30 sts, [sc in next 5 sts, sc2tog,] 6 times, sl st to join, (66 sc).
Rounds 11-12: Ch 3, ldc in each st around, sl st to join, (66 ldc, 2 rounds).
Round 13: Ch 1, sc in next 30 sts, [sc in next 4 sts, sc2tog,] 6 times, sl st to join, (60 sc).
Mark center stitch (on back/round) side of bag on round 15 for top flap placement.
Round 14-15: Ch 3, ldc in each st around, sl st to join, (60 ldc, 2 rounds).
You will create holes for the backpack strings to thread through in R16.
Round 16: Ch 4, ltr in next 3 sts, ch 2 and skip next 2 sts, [tr in next st, ltr in next 2 sts (work into the crossbars of the tr), ch 2, skip next 2 sts,] 11 times, sl st to join, (12 ch-2 sp, 12 tr, 24 ltr).
Round 17-18: Ch 1, sc in each st around, sl st to join, (60 sc, 2 rounds). FO weave in ends. Continue with Top Flap.
TOP FLAP:
- Work holding 2 strands together.
- The Top Flap is worked in unjoined u-shaped rows, around a central chain.
Row 1: Ch 12, sc in 2nd ch from hook and next 9 chs, 4 sts in last ch, rotate working back down opposite side of beginning ch, sc in next 10 sts, turn, (24 sc).
Row 2: Ch 1, sc in next 10 st, 2 sc in next 4 sts, sc in next 10 sts, turn, (28 sc).
Row 3: Ch 1, sc in next 11 sts, [2 sc in next st, ch 1, 2 sc in next st, sc in next 2 sts,] 2 times, sc in next 9 sts, turn, (2 ch-1 sp, 32 sc).
Row 4: Ch 1, sc in next 12 sts, [2 sc in next st, ch 1, skip ch-1sp, 2 sc in next st, sc in next 4 sts,] 2 times, sc in next 8 sts, turn, (2 ch-1 sp, 36 sc).
Row 5: Ch 1, sc in next 13 sts, [2 sc in next st, ch 1, skip ch-1sp, 2 sc in next st, sc in next 6 sts,] 2 times, sc in next 7 sts, turn, (2 ch-1 sp, 40 sc).
Row 6: Ch 1, sc in next 14 sts, [2 sc in next st, ch 1, skip ch-1sp, 2 sc in next st, sc in next 8 sts,] 2 times, sc in next 6 sts, turn, (2 ch-1 sp, 44 sc).
Row 7: Ch 1, sc in next 15 sts, [2 sc in next st, ch 1, skip ch-1sp, 2 sc in next st, sc in next 10 sts,] 2 times, sc in next 5 sts, turn, (2 ch-1 sp, 48 sc).
Row 8: Ch 1, sc in next 16 sts, [2 sc in next st, ch 1, skip ch-1sp, 2 sc in next st, sc in next 12 sts,] 2 times, sc in next 4 sts, turn, (2 ch-1 sp, 52 sc).
Row 9: Ch 1, sl st in next 18 sts, skip ch-1, sl st in next 8 sts, ch 10, sl st in same st and next 8 sts, skip ch-1, sl st in next 18 sts, turn and evenly sl st 16 along the bottom of the flap, (10 ch, 69 sl sts). FO and leave a long tail for sewing to the backpack.
SEW TOP FLAP TO THE BAG:
Line the top flap up centered on the outside back of the bag. Place the bottom of the flap even with the bottom of round 15. Use the yarn tail to stitch the bottom of the flap to the backpack. FO and weave in the ends. Stitch a 1-2” button or toggle on the front of the cap, positioned at round 10-11, centered in the middle.

MUSHROOM SPOTS:
A suggested number range is given per size. Make as many or few spots as you’d like using the stem color or an accent color.
SMALL SPOTS: (Make 4-5)
- Work holding a single strand of yarn.
Round 1: Make a Magic Circle, ch 1, 8 hdc in magic circle, sl st to join, (8 hdc).
Round 2: Sl st in each st around, (8 sl st). FO and leave a long tail to stitch to cap
MEDIUM SPOTS: (Make 2-3)
- Work holding a single strand of yarn.
Round 1: Make a Magic Circle, ch 1, 8 hdc in magic circle, sl st to join, (8 hdc).
Round 2: Ch 1, 2 hdc in each st around, sl st to join, (16 hdc).
Round 3: Sl st in each st around, (16 sl st). FO and leave a long tail to stitch to cap.
LARGE SPOTS: (Make 1-2)
- Work holding a single strand of yarn.
Round 1: Make a Magic Circle, ch 1, 8 hdc in magic circle, sl st to join, (8 hdc).
Round 2: Ch 1, 2 hdc in each st around, sl st to join, (16 hdc).
Round 3: Ch 1, [hdc, 2 hdc in next st,] 8 times, sl st to join, (24 hdc).
Round 4: Sl st in each st around, (24 sl st). FO and leave a long tail to stitch to cap.
SEW SPOTS TO CAP/TOP FLAP:
Lay bag out flat positioning spots as you like on cap and top flap and determine placement. Pin them in place and stitch to the cap/flap using yarn ends and whipstitch or running stitch. Weave in ends.
OPTIONAL POCKET:
- Work holding 2 strands together.
- Leave a long tail to sew the pocket.
Row 1: Ch 17, sc in 2nd ch from hook and next 15 sts, turn, (16 sc).
Rows 2-14: Ch 1, sc in each st across, turn, (16 sc). FO and leave a long tail to sew the pocket to your backpack.
SEW POCKET TO THE BAG:
Turn the bag inside out. Line the pocket up centered on the inside, back of the bag. Place the bottom of the pocket 3-4 rows from the bottom of the stem. Use the yarn tails to stitch the sides and bottom of the pocket to the backpack. FO and weave in the ends.
BACKPACK STRINGS: (Make 2)
Keep in mind each string will run from the bottom corner of the stem, around the shoulder through the openings in round 16, back over the shoulder and to the bottom corner of the stem where it is knotted.
CHAIN LENGTHS:
SMALL: 65 – 70 inches
MEDIUM: 71 – 75 inches
LARGE: 76 – 80 inches
XLARGE: 81 – 85 inches
CREATE THE STRINGS: (Make 2)
- Work holding a single strand of yarn.
- Use G/6 4.0-4.25 hook for strings.
- Use the cap, stem, or accent color.
STEP 1: Create a chain based on the length you want your strings to be, turn, ch 1 and sc into each ch of the string.
STEP 2: Ch 1, turn, spk st in each st from step 1. FO and weave in ends. Make 2 strings.
ADD STRINGS TO BAG:
STEP 1: Weave drawstring through the spaces R16, and bring both ends down to the outer corner of the bottom of the stem. STEP 2: Insert a hook in the space between stitches at bottom corner outer edge, just above final row 14 of stem base. Use the hook to pull one string end into the bag. Insert hook in one space over and pull second string end through in same manner.
STEP 3: Repeat with the other drawstring, weaving through the same holes. Pull string ends through outer stitches on the opposite side of the stem.
STEP 4: Carefully turn bag inside out and tie the string ends together on each side using a double (square) knot or overhand knot to secure. Pull both strings away from the center to cinch the bag.
Alternatively, instead of pulling end through and knotting them, you can stitch both ends to the bottom corner of the stem securely.
LEAVES BAG CHARM:
- Use a single strand of yarn and G 4.0 mm hook
- Leaves are created working down one side and up the other side of central chain
FIRST LEAF:
Step 1: Ch 8, sl st in 2nd ch from hook, sc in next 2 ch, hdc in next 2 ch, 2 dc in next ch, 6 dc in last ch, rotate now working down the opposite side of the beginning ch, 2 dc in next ch, hdc in next 2 ch, sc in next 2 ch, sl st in top of 1st ch, (2 sl sts, 4 sc, 4 hdc, 10 dc).
Step 2: Ch 1, sk sl st from prev round, sl st (loosely) in next 10 st, ch 18, sl st in same st and next 8 sts, sl st into 1st ch to help point the end, (18 ch, 20 sl sts). FO and weave in ends.
SECOND LEAF:
Step 1: Ch 8, sl st in 2nd ch from hook, sc in next 2 ch, hdc in next 2 ch, 2 dc in next ch, 6 dc in last ch, rotate now working down the opposite side of the beginning ch, 2 dc in next ch, hdc in next 2 ch, sc in next 2 ch, sl st in top of 1st ch, (2 sl sts, 4 sc, 4 hdc, 10 dc).
Step 2: Ch 1, sk sl st from prev round, sl st (loosely) in next 10 st, ch 18, insert the second leaf through the loop of the first leaf and over the chains before continuing, sl st in same st and next 8 sts, sl st into 1st ch to help point the end, (18 ch, 20 sl sts). FO and weave in ends.
ADD THE CHARM TO YOUR BAG:
To hang your charm, loop one leaf around a strap or handle of the bag, then insert the other leaf through the loop and pull them away from one another to secure!
Woodland Faerie Forager Crochet Backpack Pattern!
The Faerie Forager Mushroom Backpack is made for wanderers, crafters, and anyone who loves a hint of magic in everyday life. ✨ It’s sturdy enough for school or errands yet playful enough for festivals, and woodland picnics. The soft textures and earthy tones work just as well for a cosplay costume as they do for a child’s school bag or foraging satchel. With the free pattern now part of the Furls Crochet blog hop, you can join in, try something new, and create a bag that feels as magical as it is practical.
Thanks so much for reading! Have you visited Furls for the full blog hop? Did you find a couple of new patterns you can’t wait to make? Let me know! If not, CLICK HERE to check them out!
Are you a member of my VIP list or VIP Facebook group? If so, remember you can use your VIP ONLY coupon code to save $2 off any pattern purchase! Not a member? Join today!


Please Share Your Mushroom Backpacks!
I hope you have fun making your own Faerie Forager Mushroom Free Crochet Backpack Pattern. This pattern was so much fun to create, and I can’t wait to see it in your hands (and on your backs!). I’d absolutely love to see your finished backpacks, so please share them on Ravelry or social media and tag me so I don’t miss them! Seeing your projects out in the world truly makes my day — it’s why I keep designing. (Well… that and the yarn shopping, of course!)
Do you LOVE Free Crochet Patterns (<– like these) and do you want to see more of them on my blog? If so, please help me grow by sharing this blog Post with you crochet loving friends, and subscribing to my VIP newsletter! Thank so much for your support and for joining me on this journey, filled with yarn! If you have questions or need help of any kind with the pattern, don’t hesitate to contact me or leave a comment on the blog. I’m here to help!

Want the Power to Pause Your Project??
Want a better way to keep track of your works in progress? Download a FREE copy of my Printable WIP Cards and never forget which hook, or yarn, or pattern you were using again!


